Why does chicken stick to the pan? It usually happens because the surface is not properly preheated, the chicken is damp, there is too little fat, or you try to turn it before a browned crust has formed. The good news is that sticking is rarely a sign that you need a special pan. A few small changes in heat, moisture, and timing can help chicken release cleanly while keeping the outside golden and the center juicy.
This guide explains why chicken sticks to stainless steel, cast iron, and nonstick cookware; how to prevent torn skin and lost seasoning; and what to do when a piece has already attached itself to the pan. The method works for chicken breasts, thighs, cutlets, and bite-size pieces used in weeknight skillets.
Quick answer: how to keep chicken from sticking
- Pat the chicken completely dry.
- Use a clean pan with a smooth cooking surface.
- Preheat the pan before adding oil.
- Add enough oil to lightly coat the cooking area.
- Let the oil heat before adding the chicken.
- Place the chicken in one layer without crowding.
- Keep the heat steady rather than constantly changing it.
- Leave the chicken alone until a crust forms.
- Use a thin spatula or tongs to test one edge gently.
- Cook poultry to 165°F (74°C), measured in the thickest part.
The most important habit is patience. At first, proteins can bond to a hot metal surface. As the chicken browns and the surface moisture evaporates, it usually releases more easily. Pulling too early tears the crust and leaves flavorful pieces behind.
Why does chicken stick to the pan?
Raw chicken contains water and proteins. When it touches metal, moisture begins to evaporate and the proteins make close contact with the pan. If the temperature, oil, or timing is wrong, those proteins hold tightly to the surface. A properly developed crust creates a drier layer that separates more readily.
Sticking is therefore not caused by one single mistake. A cold pan can make the chicken slowly leak moisture. An extremely hot pan can scorch the surface before the center cooks. Wet chicken cools the pan and creates steam. Crowding traps that steam around every piece. Moving the chicken too soon interrupts browning before the food has a chance to release.
The chicken is too wet
Surface moisture is one of the most common causes. Chicken from a package may look dry but still hold a thin film of liquid. Marinades add even more moisture, especially when excess marinade goes into the pan with the meat. Instead of searing, the chicken steams and forms pale patches that cling to the surface.
Blot the chicken with clean paper towels immediately before seasoning. If it has been marinated, lift it out and allow the excess to drip away. Do not rinse raw chicken; the USDA advises against washing poultry because splashing water can spread bacteria around the sink and nearby surfaces. Drying with disposable towels is enough.
The pan or oil is not ready
A pan needs time to heat evenly. Adding chicken to a cold skillet makes the temperature rise slowly, encouraging the meat to release liquid before browning starts. For stainless steel, preheat the empty pan over medium heat, then add oil and let it become fluid and glossy. For enameled cookware, follow the manufacturer’s guidance and preheat gradually with oil rather than heating it empty.
Cast iron also benefits from steady preheating. Lodge recommends preheating a skillet and using enough oil to help prevent food from sticking. Avoid racing to the highest burner setting: cast iron holds heat well, and excessive heat can burn the outside of the chicken and the seasoning in the pan.
There is not enough cooking fat
Oil fills microscopic gaps between the food and the cooking surface. You do not need a deep pool, but the bottom of the pan should have a thin, continuous coating. If dry spots appear when you tilt the skillet, add a little more oil before the chicken goes in.
Choose an oil suitable for sautéing, such as avocado, canola, grapeseed, or regular olive oil. Butter adds flavor but its milk solids can brown quickly. For a buttery result, begin with oil and add a small amount of butter later, once the initial sear is established.
You are turning it too early
Freshly placed chicken may resist when you try to lift it. That does not always mean something has gone wrong. Give it another minute, then test one corner. When the underside is properly browned, it should release with noticeably less resistance. Thin cutlets cook quickly, so watch the edges and use a thermometer instead of waiting blindly.
This same principle helps when making creamy garlic chicken and asparagus. Sear the chicken first, remove it when cooked, and build the sauce from the browned bits left in the skillet.
How to stop chicken from sticking step by step
1. Choose evenly sized pieces
Pieces of similar thickness brown and finish at roughly the same time. Pound very thick chicken breasts to an even thickness or slice them horizontally into cutlets. For a skillet dinner, cut the meat into uniform chunks. Uneven pieces force you to choose between moving the smaller pieces too soon and overcooking the larger ones.
2. Dry first, then season
Pat every side dry, then season just before cooking. Salt can draw moisture to the surface when it sits for only a short time. Either cook immediately after seasoning or salt the chicken well in advance and leave it uncovered in the refrigerator so the surface has time to dry again.
Be careful with spice blends containing sugar. Sugar browns quickly and can stick before the chicken itself is ready to turn. Use moderate heat, and save sweet barbecue sauce, honey, or maple glazes for the final minutes.
3. Preheat with control
Set a stainless-steel or cast-iron skillet over medium heat for a few minutes. The exact time depends on the pan’s weight and your burner. Add oil and swirl it across the surface. The oil should move easily and look glossy, but it should not be producing heavy smoke.
If the oil immediately smokes aggressively, remove the pan from the burner briefly and lower the heat. A pan that is too hot can burn spices, darken the oil, and seize the exterior of the meat before the center approaches a safe temperature.
4. Add chicken in a single layer
Leave a little space around every piece. When the pan is crowded, the temperature drops and released moisture cannot escape. The chicken becomes pale and wet, making sticking more likely. Cook in two batches if necessary, adding a little fresh oil between batches.
This matters in recipes with vegetables too. In a chicken and broccoli dinner, brown the chicken in batches before the broccoli or sauce is added. Both ingredients cook more predictably when the pan is not overloaded.
5. Do not force the first turn
Once the chicken is in the skillet, leave it in place. Pressing, sliding, and repeatedly lifting it prevents a consistent crust. When the edges look opaque and the underside smells roasted rather than raw, gently test one piece. If it still grips the pan, wait briefly and test again.
6. Finish safely without overcooking
Use an instant-read thermometer in the thickest part, avoiding bone. The USDA safe minimum for all poultry is 165°F (74°C). For a thin breast or cutlet, insert the probe from the side so the sensing area reaches the center. A thermometer helps you avoid both undercooking and the extra time that makes lean chicken dry.
If you are making a sauce, remove the browned chicken to a clean plate, prepare the sauce, then return the chicken only long enough to finish cooking. That approach works well for Boursin chicken and creamy Tuscan chicken orzo.
What to do when chicken is already stuck
First, stop pulling. Tugging harder usually separates the browned layer from the meat. Lower the utensil and give the chicken more time. Use a thin metal spatula on stainless steel or cast iron, sliding it under one edge rather than lifting straight up. Use silicone or wood on a nonstick surface to avoid scratching the coating.
If the pan looks dry, drizzle a teaspoon of oil around the stuck edges. Do not pour cold liquid into very hot oil. When the chicken is safely cooked and removed, use the stuck browned bits as flavor: reduce the heat, remove any burnt black pieces, add a measured splash of broth or water, and scrape gently while the liquid simmers.
Those browned bits are called fond. Golden-brown fond can deepen a pan sauce, while black, acrid residue tastes burnt and should not be mixed into dinner. If you plan to add dairy, let the pan cool slightly and follow the gentle-heat method in how to keep cream sauce from splitting.
Does the type of pan matter?
Stainless steel
Stainless steel rewards good preheating and patience. It creates strong browning and useful fond, but it is less forgiving when the chicken is wet or turned early. Use medium heat, a complete film of oil, and a thin spatula. Let release, not the clock alone, guide the first turn.
Cast iron
Well-seasoned cast iron holds steady heat and browns chicken effectively. Preheat gradually and avoid excessive burner settings. Acidic sauces can be added briefly to a well-seasoned pan, but long simmering may affect the seasoning or create a metallic taste in some cookware.
Nonstick
Nonstick cookware reduces sticking and is convenient for lean cutlets, but it generally produces less fond. Use low to medium heat and nonmetal utensils. Replace a pan with peeling or badly damaged coating, and follow its manufacturer’s temperature and care instructions.
Common mistakes that make chicken stick
- Cooking straight from a wet marinade: drain the excess and blot the surface.
- Using frozen or partly frozen chicken: uneven thawing releases moisture and makes the center difficult to cook evenly.
- Starting with a dirty pan: old residue creates rough, burnt patches that grab the meat.
- Adding cold chicken to a barely warm skillet: the pan loses heat before browning begins.
- Using only butter over high heat: the milk solids may burn before the chicken releases.
- Crowding the skillet: trapped steam prevents a dry crust.
- Flipping repeatedly: each early movement interrupts browning.
- Adding sauce too soon: liquid stops the sear and turns the process into a simmer.
Koukie’s Little Touch
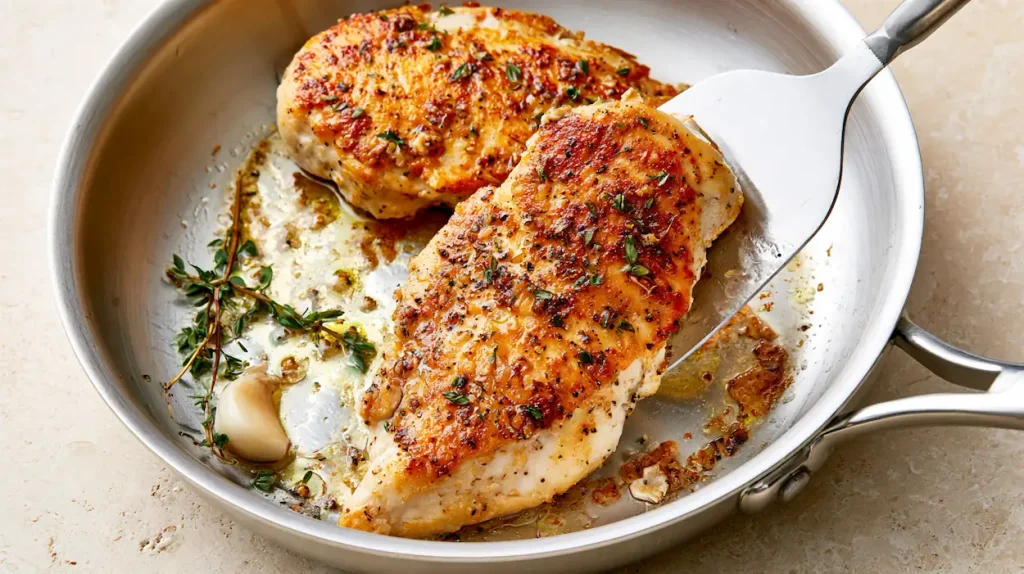
I add a small knob of butter, a lightly crushed garlic clove, and a sprig of thyme only after the chicken has released and been turned. Tilting the pan and spooning that fragrant butter over the top adds a warm finish without risking burnt butter during the first sear.
Helpful Tips
- Keep a clean plate ready for the cooked chicken; never return it to the plate that held it raw.
- Use paper towels to dry the surface instead of rinsing poultry.
- Cook in batches when the pieces cannot sit in one uncrowded layer.
- Test one edge gently and wait if the chicken still resists.
- Check doneness with a thermometer rather than color alone.
How sticking changes in one-pan recipes
One-pan recipes often ask you to brown chicken, remove it, cook vegetables or aromatics, add liquid, and return the meat. That order is deliberate. The dry first stage creates color; the liquid second stage loosens the fond and cooks the rest of the dish. Adding broth at the beginning prevents searing, while leaving chicken in the pan throughout can overcook it.
For a rice-based example, see one-pan chicken and rice. If the pan becomes watery because vegetables release moisture, the issue is different from sticking; the guide to preventing a watery casserole explains how to manage excess liquid.
Frequently asked questions
Why does chicken stick even when I use oil?
Oil cannot compensate for a cold pan, wet chicken, crowding, or turning too early. Preheat the pan, heat a complete film of oil, dry the meat, and allow the underside to brown before testing it.
Should I use oil or butter to keep chicken from sticking?
Start with a sautéing oil because it tolerates the initial heat better. Add butter after the first side has browned if you want its flavor. Butter used alone can brown or burn before thick chicken finishes cooking.
How long should I wait before flipping chicken?
There is no single time for every thickness and pan. Thin cutlets may need only a few minutes, while thighs take longer. Watch for browned edges, test one corner gently, and use an instant-read thermometer to confirm final doneness.
Why does breaded chicken stick to the skillet?
Breading needs enough oil and uninterrupted contact to set. Shake off loose crumbs, preheat the pan, and place the breaded pieces carefully. Turn only when the coating is golden and firm enough to lift as one layer.
Can I cook chicken in a stainless-steel pan without sticking?
Yes. Preheat the pan over medium heat, add oil, pat the chicken dry, and leave it undisturbed until it naturally releases. Stainless steel is especially useful when you want browned fond for a pan sauce.
Is chicken safe when it is browned outside?
Browning does not prove that the center is safe. Cook poultry to 165°F (74°C) and measure in the thickest part with a food thermometer. Color and juices alone are not reliable safety tests.
The simple method to remember
Dry the chicken, preheat the pan, add enough oil, leave space around each piece, and wait for the crust to release. Use moderate heat and a thermometer so you can brown the outside without drying the center. Once those habits become automatic, a little temporary grip at the beginning stops feeling like a problem and becomes part of building a flavorful sear.
For more practical kitchen answers, browse the Cooking Q&A collection.